Raspberry Pi GPIO control using Android Things and ThingsBoard
- Introduction
- Prerequisites
- List of hardware and pinouts
- Wiring schema
- Programming the Raspberry Pi
- Data visualization
- See also
- Your feedback
- Next steps
Introduction
ThingsBoard is an open-source server-side platform that allows you to monitor and control IoT devices. It is free for both personal and commercial usage and you can deploy it anywhere. If this is your first experience with the platform we recommend to review what-is-thingsboard page and getting-started guide.
This sample application will allow you to control GPIO of your Raspberry Pi device using ThingsBoard RPC widgets. We will observe GPIO control using LEDs connected to the pins. The purpose of this application is to demonstrate ThingsBoard RPC capabilities.
Raspberry Pi will use simple Android Things application that will connect to ThingsBoard server via MQTT and listen to RPC commands. Current GPIO state and GPIO control widget is visualized using built-in customizable dashboard.
The video below demonstrates the final result of this tutorial.
Prerequisites
You will need to have ThingsBoard server up and running. Use either Live Demo or Installation Guide to install ThingsBoard.
List of hardware and pinouts
-
Raspberry Pi - we will use Raspberry Pi 3 Model B but you can use any other model.
-
11 LEDs with corresponding resistors
-
13 female-to-male jumper wires
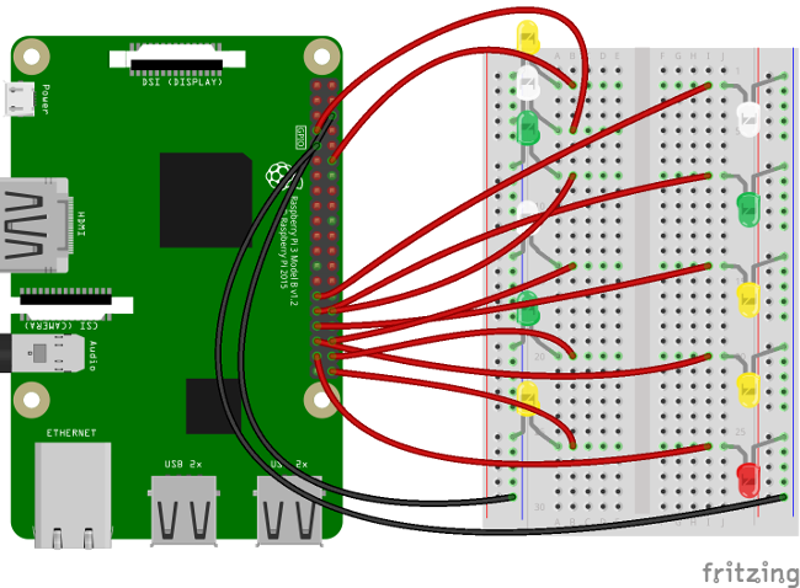
Wiring schema
Since our application will allow us to control the state of all available GPIO pins, we recommend attaching some LEDs to those pins for visibility. You can use this basic instruction or another one to wire some LEDs. Below is sample wiring schema used in this tutorial.
Programming the Raspberry Pi
Flashing the Android Things image
First, you need to flash Android Things image to your Raspberry Pi board using this guide. After finishing this guide make sure that your board has Internet access and accessible via adb tool.
Android Things development environment
Before starting with application introduced in this tutorial you need to prepare development environment to work with Android Things applications. Follow instructions from the official guide to build and deploy your first Android Things application.
Application source code
Now you should obtain the source code of the GpioControlSample application from ThingsBoard samples GitHub repository. You can do this by issuing the following git clone command:
git clone https://github.com/thingsboard/samples
Open cloned samples folder and navigate to android-things/GpioControlSample.
Open GpioControlActivity.java file located at app/src/main/java/org/thingsboard/sample/gpiocontrol folder.
You will need to modify THINGSBOARD_HOST constant to match your ThingsBoard server installation IP address or hostname. Use “demo.thingsboard.io” if you are using live demo server.
The value of ACCESS_TOKEN constant corresponds to sample Raspberry Pi device in pre-provisioned demo data. If you are using live demo server - get the access token for pre-provisioned “Raspberry Pi Demo Device”.
Running the application
Make sure that your Raspberry device is accessible via adb tool:
adb devices
Navigate to GpioControlSample application folder and deploy application to the device:
./gradlew assembleDebug
adb push ./app/build/outputs/apk/app-debug.apk /data/local/tmp/org.thingsboard.sample.gpiocontrol
adb shell pm install -r "/data/local/tmp/org.thingsboard.sample.gpiocontrol"
Or you can use other options to deploy the Android application:
Finally you can start the application by issuing the following adb command:
adb shell am start -n "org.thingsboard.sample.gpiocontrol/org.thingsboard.sample.gpiocontrol.GpioControlActivity" -a android.intent.action.MAIN -c android.intent.category.LAUNCHER
Data visualization
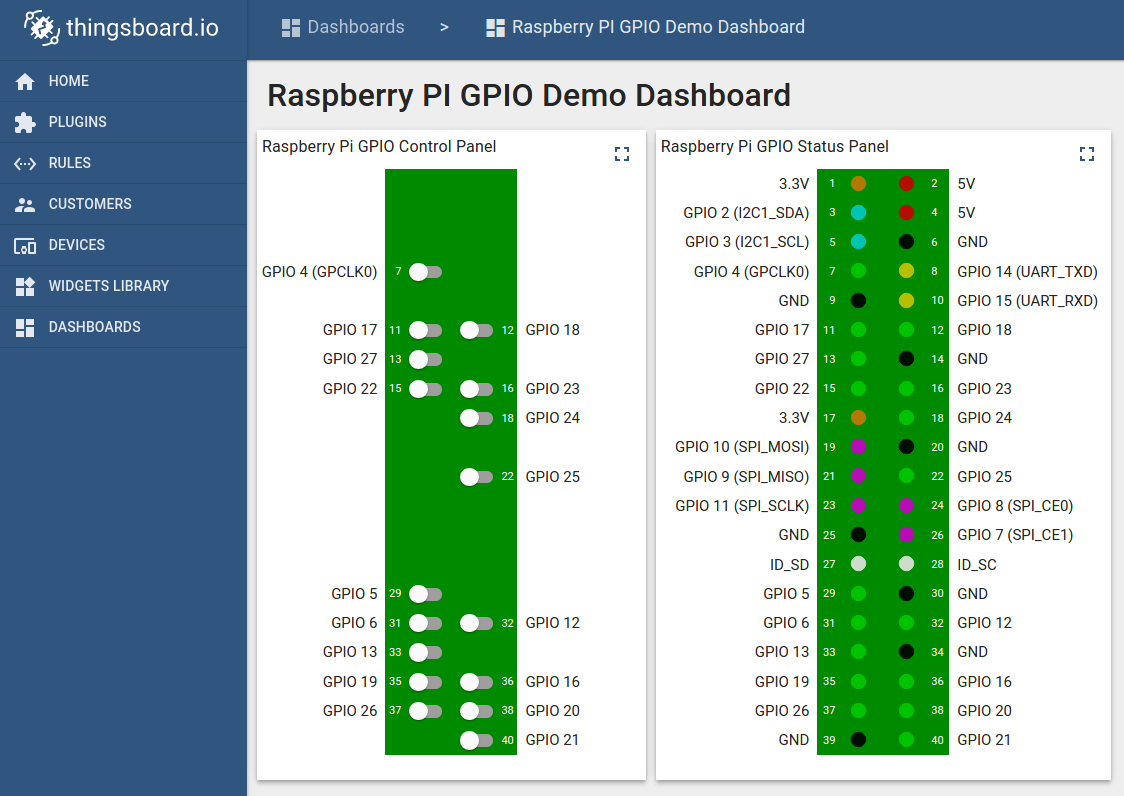
In order to simplify this guide, we have included “Raspberry PI GPIO Demo Dashboard” to the demo data that is available in each ThingsBoard installation. Of course, you can modify this dashboard: tune, add, delete widgets, etc. You can access this dashboard by logging in as a tenant administrator.
In case of local installation:
- login: tenant@thingsboard.org
- password: tenant
In case of live-demo server:
- login: your live-demo username (email)
- password: your live-demo password
See live-demo page for more details how to get your account.
Once logged in, open Dashboards->Raspberry PI GPIO Demo Dashboard page. You should observe demo dashboard with GPIO control and status panel for your device. Now you can switch status of GPIOs using control panel. As a result, you will see LEDs status change on the device and on the status panel.
Below is the screenshot of the “Raspberry PI GPIO Demo Dashboard”.
See also
Browse other samples or explore guides related to main ThingsBoard features:
- Device attributes - how to use device attributes.
- Telemetry data collection - how to collect telemetry data.
- Using RPC capabilities - how to send commands to/from devices.
- Rule Engine - how to use rule engine to analyze data from devices.
- Data Visualization - how to visualize collected data.
Your feedback
Don’t hesitate to star ThingsBoard on github to help us spread the word. If you have any questions about this sample - post it on the issues.
Next steps
-
Getting started guides - These guides provide quick overview of main ThingsBoard features. Designed to be completed in 15-30 minutes.
-
Installation guides - Learn how to setup ThingsBoard on various available operating systems.
-
Connect your device - Learn how to connect devices based on your connectivity technology or solution.
-
Data visualization - These guides contain instructions how to configure complex ThingsBoard dashboards.
-
Data processing & actions - Learn how to use ThingsBoard Rule Engine.
-
IoT Data analytics - Learn how to use rule engine to perform basic analytics tasks.
-
Advanced features - Learn about advanced ThingsBoard features.
-
Contribution and Development - Learn about contribution and development in ThingsBoard.