OAuth 2.0 Support
Overview
ThingsBoard allows you to provide Single Sign On functionality for your customers and automatically create tenants, customers or subcustomers using external user management platforms, that supports OAuth 2.0 protocol.
This guide is only for the Google OAuth.
Scenario description
In this guide we will configure the OAuth with the Google for the authentication. User is going to be logged into the Tenant and Tenant name is going to be equal to the users email. If Tenant does not exist in the system, the new Tenant will be created.
To map those external user infos from Google and Auth0 platform we are going to use built-in basic mapper.
If basic mapper functionality will not fit your business needs, you can configure the custom mapper so that you are able to add an implementation that fits under your specific needs.
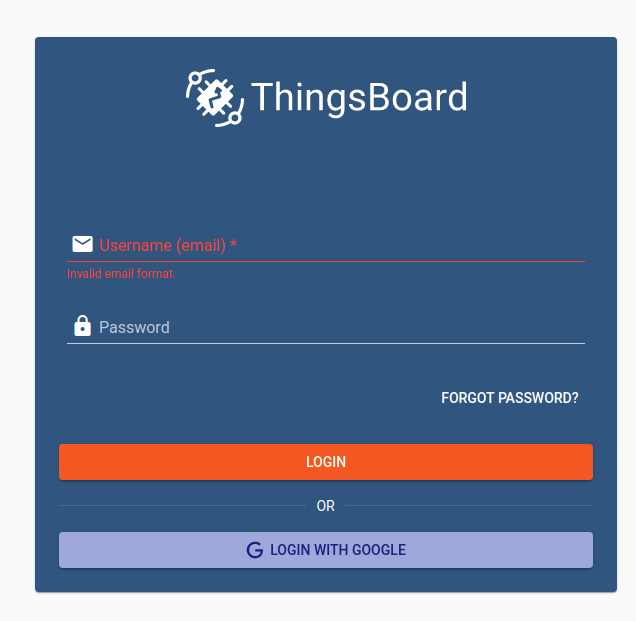
Login with Google
Preparations
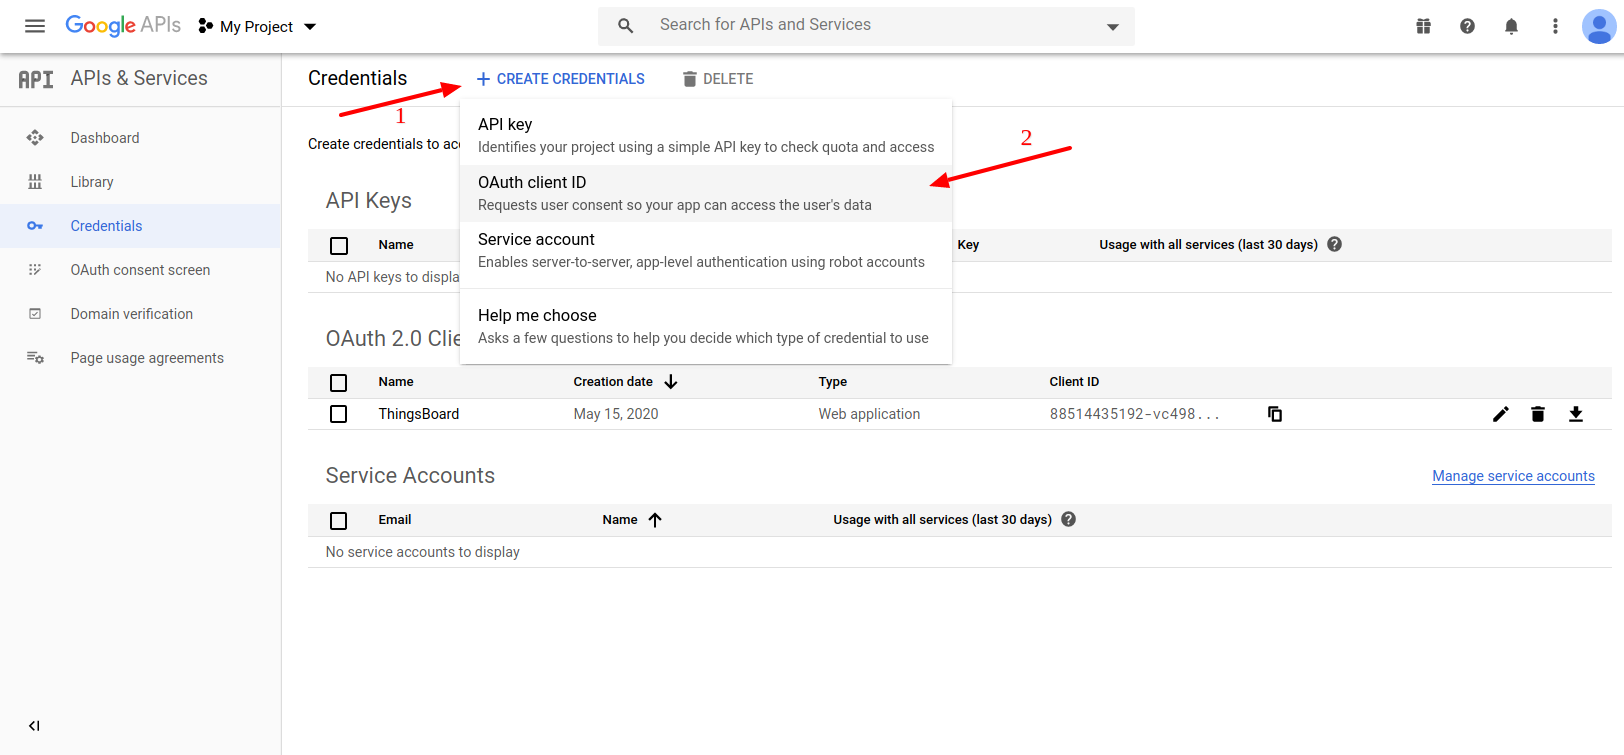
To apply the configurations properly, we need to obtain the clientName, clientId and clientSecret first. For this reasons we first go for the Google Developer Consnole.
First we need to go for the credentials tab.
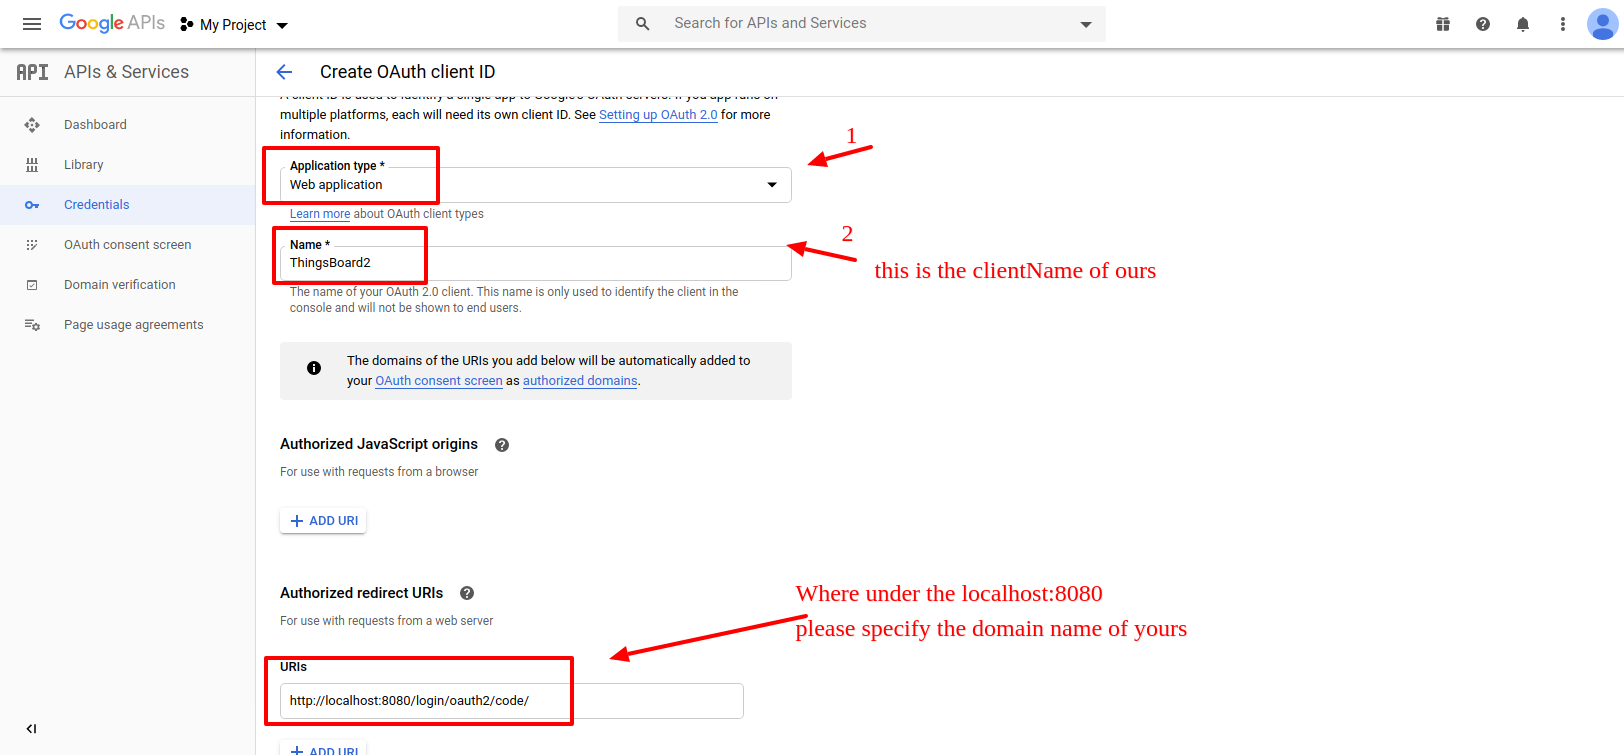
The next step is to create the OAuth client.
For the creation we need to specify the Web application for the Application type, the clientName for the Name and the rediroect URIs please specify the redirect URI for the instance of yours.
The redirect URI needs to be specified in the next format:
http://domain:port/login/oauth2/code/
Where under the domain, please, specify the current domain of yours and for the port please specify the port to have an HTTP access to the ThingsBoard instance of yours.
For the example reasons, the domain of my is the localhost, and the port is being the default ThingsBoard installation port 8080.
After that, after the Create being pressed, the credentials - clientId and clientSecret are received.
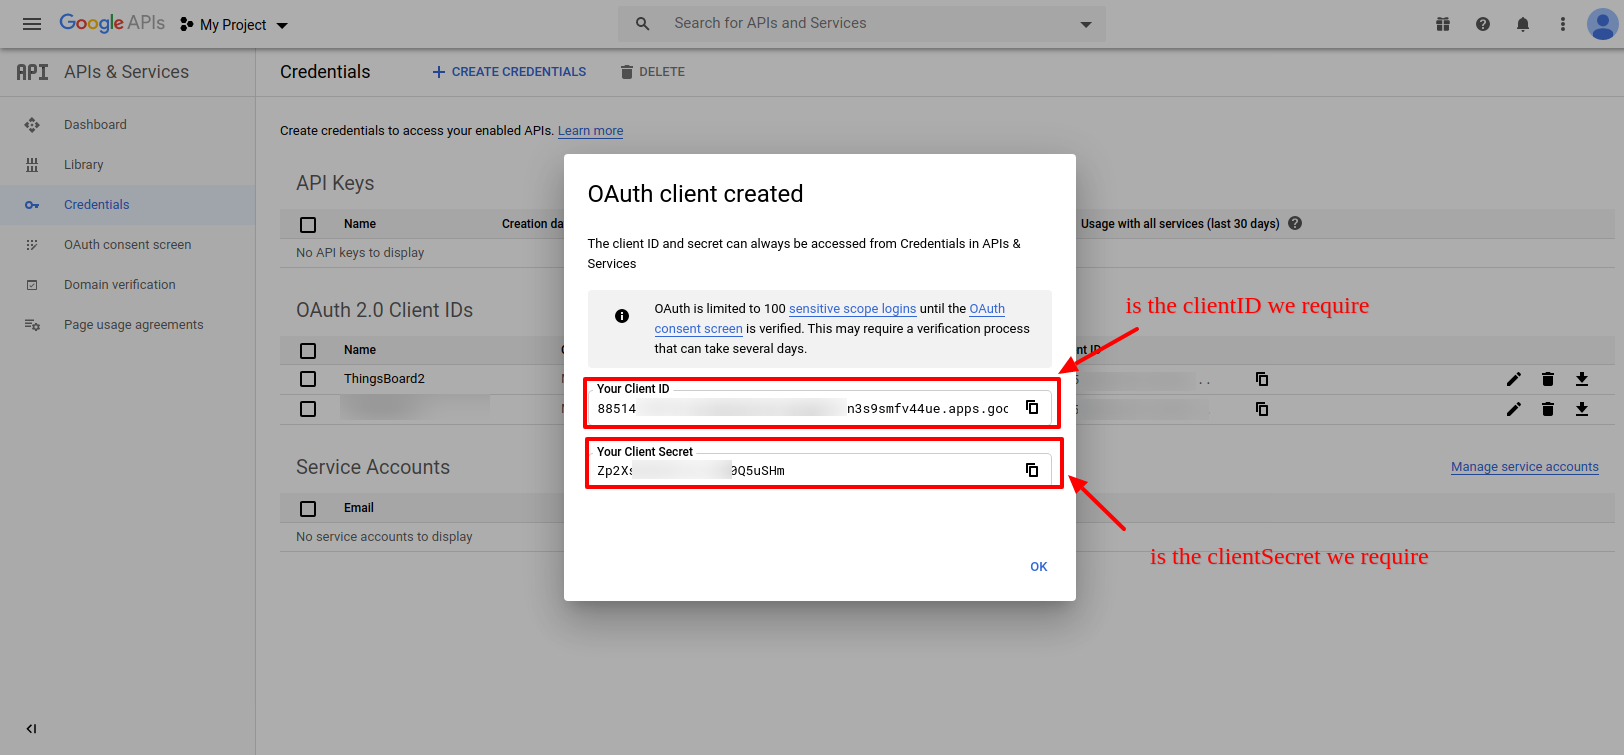
So that we have received three values which are required to be inserted for the thingsboard.yml of ours.
In the example of ours those equals:
clientName=ThingsBoard2
clientId=XXXXXXXX
clientSecret=YYYYYYYY
So that now we need to insert those for the thingsboard.yml.
We also need to acquire the list of the links for the next variables:
SECURITY_OAUTH2_DEFAULT_ACCESS_TOKEN_URI
SECURITY_OAUTH2_DEFAULT_AUTHORIZATION_URI
SECURITY_OAUTH2_DEFAULT_JWK_SET_URI
SECURITY_OAUTH2_DEFAULT_USER_INFO_URI
Up to date list of those can be found using this link.
For the example of ours, those equivalent to the below.
SECURITY_OAUTH2_DEFAULT_ACCESS_TOKEN_URI=https://oauth2.googleapis.com/token
SECURITY_OAUTH2_DEFAULT_AUTHORIZATION_URI=https://accounts.google.com/o/oauth2/auth
SECURITY_OAUTH2_DEFAULT_JWK_SET_URI=https://www.googleapis.com/oauth2/v3/certs
SECURITY_OAUTH2_DEFAULT_USER_INFO_URI=https://openidconnect.googleapis.com/v1/userinfo
Result
So that, the resulted thingsboard.yml equals the below one.
...
security:
  ...
  oauth2:
    # Enable/disable OAuth 2 login functionality
    # For details please refer to https://thingsboard.io/docs/user-guide/oauth-2-support/
    enabled: "${SECURITY_OAUTH2_ENABLED:true}"
    # Redirect URL where access code from external user management system will be processed
    loginProcessingUrl: "${SECURITY_OAUTH2_LOGIN_PROCESSING_URL:/login/oauth2/code/}"
    # List of SSO clients
    clients:
      default:
        # Label that going to be show on login button - 'Login with {loginButtonLabel}'
        loginButtonLabel: "${SECURITY_OAUTH2_DEFAULT_LOGIN_BUTTON_LABEL:Google}"
        # Icon that going to be show on login button. Material design icon ID (https://material.angularjs.org/latest/api/directive/mdIcon)
        loginButtonIcon: "${SECURITY_OAUTH2_DEFAULT_LOGIN_BUTTON_ICON:mdi:google}"
        clientName: "${SECURITY_OAUTH2_DEFAULT_CLIENT_NAME:ThingsBoard2}"
        clientId: "${SECURITY_OAUTH2_DEFAULT_CLIENT_ID:XXXXXXXXXXXXXXXXXX}"
        clientSecret: "${SECURITY_OAUTH2_DEFAULT_CLIENT_SECRET:YYYYYYYYYYYYYYYYY}"
        accessTokenUri: "${SECURITY_OAUTH2_DEFAULT_ACCESS_TOKEN_URI:https://oauth2.googleapis.com/token}"
        authorizationUri: "${SECURITY_OAUTH2_DEFAULT_AUTHORIZATION_URI:https://accounts.google.com/o/oauth2/auth}"
        scope: "${SECURITY_OAUTH2_DEFAULT_SCOPE:openid,email,profile}"
        # Redirect URL that must be in sync with 'security.oauth2.loginProcessingUrl', but domain name added
        redirectUriTemplate: "${SECURITY_OAUTH2_DEFAULT_REDIRECT_URI_TEMPLATE:http://localhost:8080/login/oauth2/code/}"
        jwkSetUri: "${SECURITY_OAUTH2_DEFAULT_JWK_SET_URI:https://www.googleapis.com/oauth2/v3/certs}"
        # 'authorization_code', 'implicit', 'refresh_token' or 'client_credentials'
        authorizationGrantType: "${SECURITY_OAUTH2_DEFAULT_AUTHORIZATION_GRANT_TYPE:authorization_code}"
        clientAuthenticationMethod: "${SECURITY_OAUTH2_DEFAULT_CLIENT_AUTHENTICATION_METHOD:post}" # basic or post
        userInfoUri: "${SECURITY_OAUTH2_DEFAULT_USER_INFO_URI:https://openidconnect.googleapis.com/v1/userinfo}"
        userNameAttributeName: "${SECURITY_OAUTH2_DEFAULT_USER_NAME_ATTRIBUTE_NAME:email}"
                mapperConfig:
                  # Allows to create user if it not exists
                  allowUserCreation: "${SECURITY_OAUTH2_DEFAULT_MAPPER_ALLOW_USER_CREATION:true}"
                  # Allows user to setup ThingsBoard internal password and login over default Login window
                  activateUser: "${SECURITY_OAUTH2_DEFAULT_MAPPER_ACTIVATE_USER:false}"
                  # Mapper type of converter from external user into internal - 'basic' or 'custom'
                  type: "${SECURITY_OAUTH2_DEFAULT_MAPPER_TYPE:basic}"
                  basic:
                    # Key from attributes of external user object to use as email
                    emailAttributeKey: "${SECURITY_OAUTH2_DEFAULT_MAPPER_BASIC_EMAIL_ATTRIBUTE_KEY:email}"
                    firstNameAttributeKey: "${SECURITY_OAUTH2_DEFAULT_MAPPER_BASIC_FIRST_NAME_ATTRIBUTE_KEY:}"
                    lastNameAttributeKey: "${SECURITY_OAUTH2_DEFAULT_MAPPER_BASIC_LAST_NAME_ATTRIBUTE_KEY:}"
                    # Strategy for generating Tenant from external user object - 'domain', 'email' or 'custom'
                    # 'domain' - name of the Tenant will be extracted as domain from the email of the user
                    # 'email' - name of the Tenant will email of the user
                    # 'custom' - please configure 'tenantNamePattern' for custom mapping
                    tenantNameStrategy: "${SECURITY_OAUTH2_DEFAULT_MAPPER_BASIC_TENANT_NAME_STRATEGY:domain}"
                    # %{attribute_key} as placeholder for attribute value of attributes of external user object
                    tenantNamePattern: "${SECURITY_OAUTH2_DEFAULT_MAPPER_BASIC_TENANT_NAME_PATTERN:}"
                    # If this field is not empty, user will be created as a user under defined Customer
                    # %{attribute_key} as placeholder for attribute value of attributes of external user object
                    customerNamePattern: "${SECURITY_OAUTH2_DEFAULT_MAPPER_BASIC_CUSTOMER_NAME_PATTERN:}"
                    parentCustomerNamePattern: "${SECURITY_OAUTH2_DEFAULT_MAPPER_BASIC_PARENT_CUSTOMER_NAME_PATTERN:}" # %{attribute_key} as placeholder for attributes value b$
                    # NOTE: Next configurations available only in Professional Edition
                    userGroupsNamePattern: "${SECURITY_OAUTH2_DEFAULT_MAPPER_BASIC_USER_GROUPS_NAME_PATTERN:Tenant Administrators}" # list of comma separated user group names,$
                  custom:
                    url: "${SECURITY_OAUTH2_DEFAULT_MAPPER_CUSTOM_URL:}"
                    username: "${SECURITY_OAUTH2_DEFAULT_MAPPER_CUSTOM_USERNAME:}"
                    password: "${SECURITY_OAUTH2_DEFAULT_MAPPER_CUSTOM_PASSWORD:}"
...
After all the changes being applied, please, make sure to have the ThingsBoard restart. The ThingsBoard restart can be invoked with the next command on the Linux Server:
$ sudo service thingsboard restart
After that, proceed to the User Interface of yours, to make sure there are no troubles, press the Login With Google.
In case of the troubleshooting with those, please, contact us using the contact us form.
Next Steps
-
Getting started guides - These guides provide quick overview of main ThingsBoard features. Designed to be completed in 15-30 minutes.
-
Installation guides - Learn how to setup ThingsBoard on various available operating systems.
-
Connect your device - Learn how to connect devices based on your connectivity technology or solution.
-
Data visualization - These guides contain instructions how to configure complex ThingsBoard dashboards.
-
Data processing & actions - Learn how to use ThingsBoard Rule Engine.
-
IoT Data analytics - Learn how to use rule engine to perform basic analytics tasks.
-
Hardware samples - Learn how to connect various hardware platforms to ThingsBoard.
-
Advanced features - Learn about advanced ThingsBoard features.
-
Contribution and Development - Learn about contribution and development in ThingsBoard.